


Surya or Sun is an immense source of energy that showers its rays to millions of life forms. It is said that being thankful to Surya means being humble to the entire nature. Surya Namaskar is a series of holistic of yoga asanas that can give the body, mind and soul a perfect balance. It comprises of 12 steps and each step effects the body remarkably.
BENEFITS OF SURYA NAMASKAR:
- Surya Namaskar is one of the best overall body workouts and helps in reduction of weight, increases flexibility, enhances mental balance and makes the body fit.
- Surya Namaskar is a full body energizer that helps the body receives a perfect blood flow and oxygen so it functions to its fullest capacity.
- The series allows your heart and lungs get proper flow of oxygen thus increasing their power
- It tones the body and reduces fat in the toughest of the areas
- It can even cure ailments like sciatica, diabetes, BP, mental tension, back ache, indigestion.
- It tones up the internal organs and regulates the secretions of various glands.
The 12 steps of Surya Namaskar comprises of a total of 8 asanas. These asanas when done in the right flow and with proper breathing, they ensure longevity, rejuvenation, beauty and agility. Let’s learn how to do the Surya Namaskar:
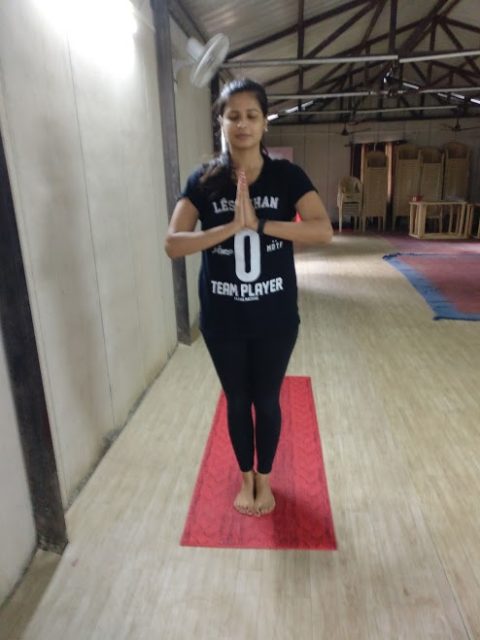
STEP 1: NAMASKAR ASANA/PRAYER POSE
Mantra associated: Om Mitraye Namah

Stand at the front side of the mat. Keep your eyes closed, shoulders relaxed, spine erect, feet together. Now make a Namaste in front of your chest and breathe deep for a couple of times.
STEP 2: HASTHA UTTANASANA/RAISED ARM POSE
Mantra Associated: Om Ravaye Namah

After the namaskar asana, inhale deep and raise the hands up, opening your eyes. Make an arc with your back as you squeeze your hips and push them forward. The Posture helps you in increasing the lungs capacity and increases the flexibility of spine.
STEP 3: PAD HASTHASANA/STANDING FORWARD BEND POSE
Mantra associated: Om Suryay Namah

After hastha uttanasana exhale out completely, squeezing your abdomen and take both the hands towards the feet. Make sure your back is flat and knees are erect. You can bend your knees a little in case you have back pain. Otherwise keep your leg straight and move as much forward as possible. With every exhalation move a little forward than before. This asana helps in increasing digestion, increasing flexibility of legs and toning of legs.
STEP 4: ASHWA SANCHALAN ASANA/HIGH LUNGE POSE
Mantra associated: Om Bhanave Namah

While inhaling put your hands down on the floor. Now bend your left leg to a ninety degree angle and take your right leg back keeping it straight. The heel of right leg is up and the leg is stretched straign. Try to look up and give your neck a good stretch. This posture helps in stretching the hamstrings and hip joints. It helps in ensuring immunity from muscles and ligament related diseases.
STEP 5: UTTHIT CHATURDANDASANA/PLANK POSE
Mantra associated: Om Khagaye Namah

Now take the left leg also back. Your heels are up and you are balancing your body on your toes and palm. Align yourself straight from your shoulders to heels and look forward. Push your body a little forward, so you align you wrist, elbows and shoulders in the same line. This asana has multiple benefits, it not only strengthens your arms, it also makes your core/abdomen stronger. Plank pose warms up the stomach making way for reduction of belly fat. It also helps in toning thighs and building stamina.
STEP 6: ASHTANGA NAMASKAR/SALUTE WITH THE EIGHT LIMBS POSE
Mantra Associated: Om Pooshne namah

From Plank pose, hold the breath and take your knees, chest and chin on the mat. Your stomach and thighs should be up and your elbows should be close to the chest. This asana also helps in increasing stamina.
STEP 7: BHUJANGASANA/COBRA POSE
Mantra associated: Om Hiranyagarbhaye Namah
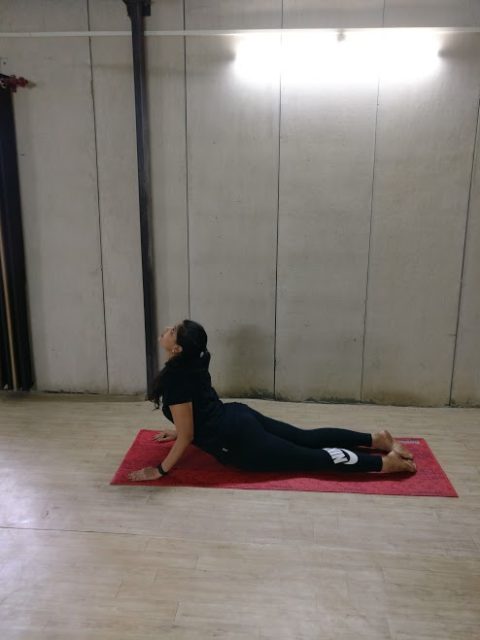
Inhale and push your chest forward, shoulders down and bend your elbows close to the rib cage. Keep the heels and toes together and push the naval down on the mat. Push your chin up and look up. Bhujangasana helps in making your lower back healthy, it also opens the shoulders and chest improving your posture. Thyroid gland is also activated during the asana.
STEP 8: ADHOMUKH SVANASANA/DOWNWARD FACING DOG POSE
Mantra Associated: Om Marichaye Namah

Exhale softly and curl your toes in. Raise your hips up, making sure your palms and feet are flat down on the mat. Your heels should be touching down and knees should be straight. One can close the eyes in the asana and channelize the flow of breath to relax the back. Downward facing dog pose helps in improving flexibility of spine and legs.
STEP 9: ASHWA SANCHALANASANA/HIGH LUNGE POSE
Mantra associated: Om Aditya Namah

While inhaling bring your right foot forward between your palms. The leg moving forward is bent from the knees at a right angle. Keep your left heel up and the left leg straight. The thigh should be parallel to the mat and your face should be tilted up towards the ceiling.
STEP 10: PAD HASTHASANA/STANDING FORWARD BENDING POSE
Mantra Associated: Om Savitre Namah

Exhale and bring the left leg forward, right next to the right leg. Both the legs are now together and straight. The hands should rest on the legs and you should aim to touch the head down by keeping he leg straight. Squeeze the abdomen in to push yourself a little more than before.
STEP 11: HASTHA UTTANASANA/RAISED ARM POSE
Mantra associated: Om Arkaya Namah

Now inhale and make a Namaste with your hands and raise the Namaste up making an arc with your back. Push your head also back to see your palms. Keep your eyes open here and push the hips forward. One should try to keep the knees tight and pull the butt in to push the hips forward to enhance the dip of the body arc.
STEP 12: NAMASKAR ASANA/PRAYER POSE
Mantra Associated: Om Bhaskaraye Namah
Exhaling bring your Namaste down near your chest, close your eyes and breath for some time.
Image Courtesy : Akanksha thapliyal
10 POINTS TO REMEMBER
- One has to now switch the legs, i.e taking the left leg back in ashwasanchalan asana and complete the whole round by switching the legs in the similar way.
- Also remember to use the inhalation and exhalation during the transition of asana. Eg. Switching from Hastha uttanasana to padhasthasana requires exhalation and switching from padhasthasana to ashvasanchalan requires switching from exhalation to inhalation.
- Always breathe through your nose
- Slow the pace down when loosing breath or feeling tired. Try to alter the breathing there by taking in long breaths.
- Don’t feel bad if you are not doing it perfectly, everybody is different. So just stay there and wait the body to transform.
- In case of any type of body pain, refrain from fighting the pain. Take time and listen to your body.
- Start by doing 4-5 rounds and slowly increase the rounds as per your capacity, you can alter the speed to give your body challenges.
- People with high BP should do the Surya Namaskar slowly.
- Pregnant women should not practice this after third month of pregnancy
- Avoid the practice for first three days of menstruation.


")


")
")
")


